Running Studies
Once you have created a spec file for your workflow, it can be ran either locally or in a distributed manner.
Additionally, any user variable created in your spec file can be modified from the command line.
Being able to run in a distributed manner and the support for command line substitution opens the door to iterative runs (see the Iterative Demo for a full demonstration of this process).
Local Runs
Warning
You should not execute production runs locally. Instead, execute them in a distributed manner.
Local runs should be for testing workflow execution at very small scales.
At the start of this User Guide it's mentioned that Merlin uses a producer consumer model that relies on a centralized server. Sometimes it may be faster and easier to test the execution of a workflow without using this centralized server. This is where local runs come in handy.
In a local run, tasks are executed sequentially in your current shell and are never sent to the broker. Therefore, workers do not need to be started for a local run to execute.
Local runs are typically used when designing a workflow. They help provide users a quick way to run through their study to ensure every step is executing as expected prior to doing larger production runs that should be done in a distributed manner.
To run a study locally use the --local option of the merlin run command.
Distributed Runs
Warning
Distributed runs require a connection to both the broker and results server. See the Configuration page for instructions on how to set up these connections if you haven't done so already.
If you can run merlin info and see no errors then your connection is working.
Most of the runs done in Merlin will likely be distributed runs. These runs require:
- Tasks representing how to execute your workflow
- Workers to coordinate and execute these tasks
In a distributed run, the DAG created by the study block of your spec file is converted to Celery tasks which are then sent to queues that live on the broker. To accomplish this Merlin provides the merlin run command:
The diagram below displays the basic flow of this process:
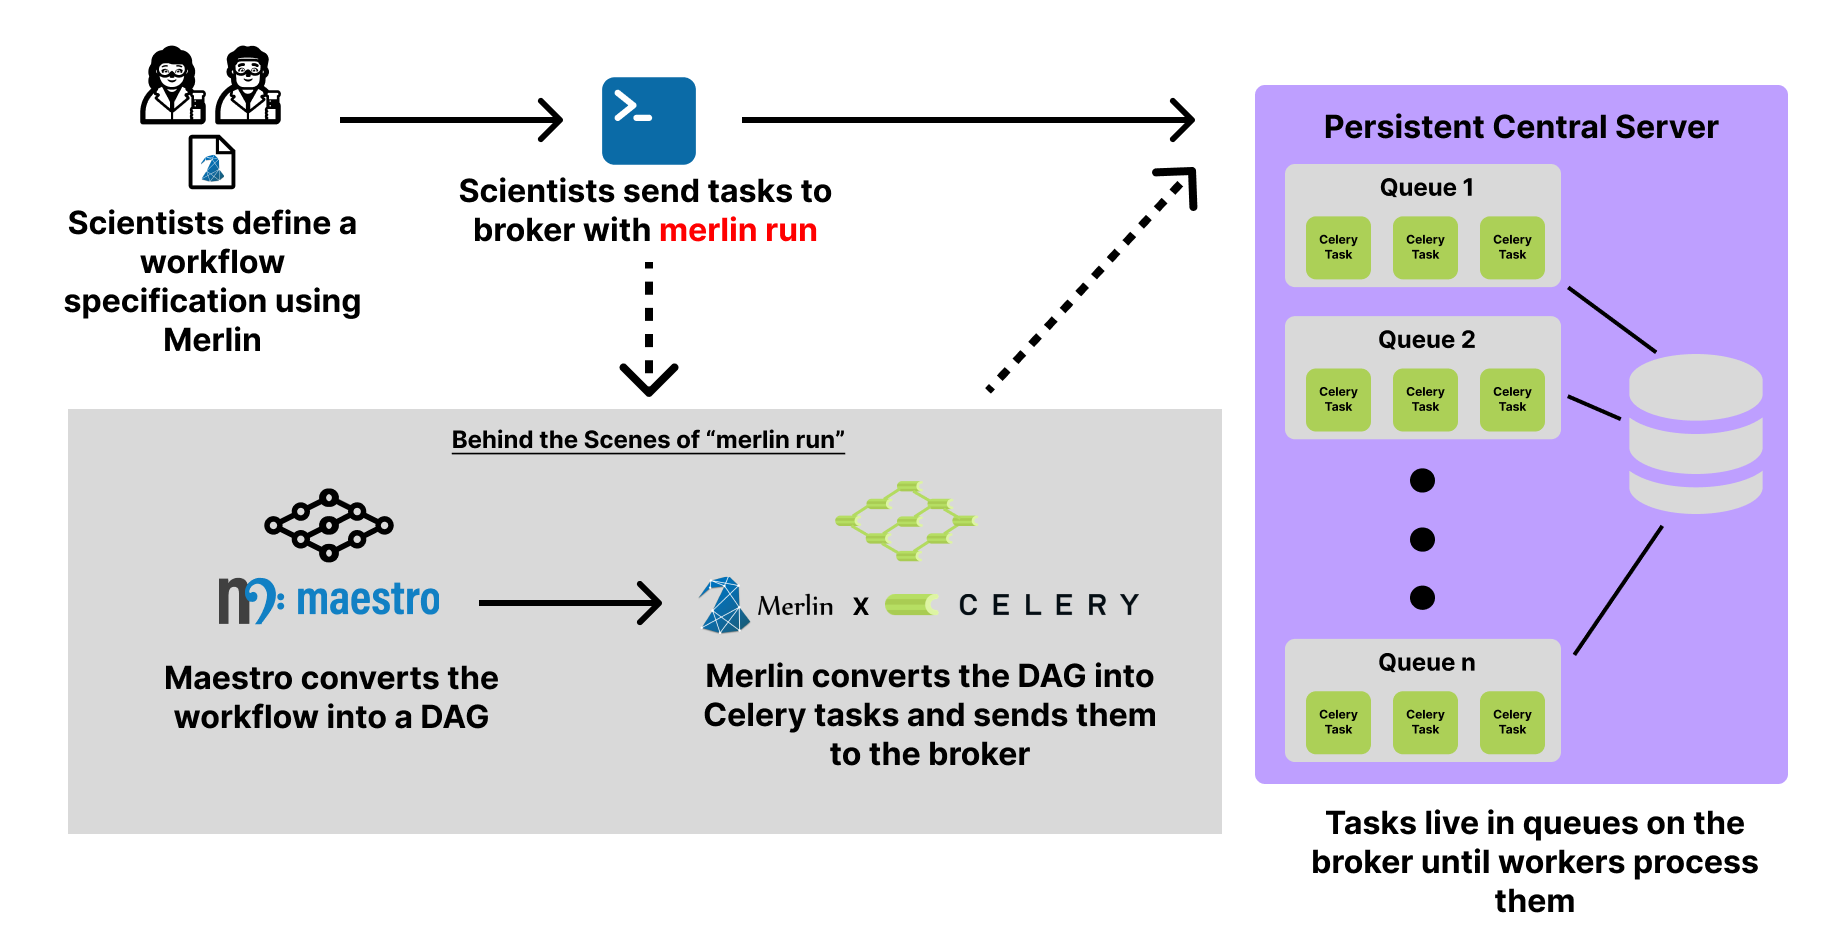
Once tasks are queued on the broker, they will remain there until we initiate workers to process them.
You can specify workers in the merlin block of your spec file. To initiate these workers on your current node, you can use the merlin run-workers command. However, workers are typically launched in parallel which will require an allocation on your preferred HPC system prior to using the merlin run-workers command.
A parallel batch allocation launch is configured to run a single worker per node. This worker will then launch a number of worker processes to manage the tasks. The number of worker processes that are launched depends on the --concurrency value provided to the workers and the number of nodes in your allocation that are running workers. In math terms: num_workers = concurrency * num_nodes. By default the concurrency value will be the number of CPUs on the node but this can be configured by users (see the Configuring Celery Workers section for more details).
A full Slurm batch submission script to run the workflow on 3 nodes is shown below.
#!/bin/bash
#SBATCH -N 3
#SBATCH -J Merlin
#SBATCH -t 30:00
#SBATCH -p pdebug
#SBATCH --mail-type=ALL
#SBATCH -o merlin_workers_%j.out

# Assumes you are running this in the same dir as the yaml file.
YAML_FILE=input.yaml

# Source the merlin virtualenv (if using csh, change this to 'activate.csh' in the statement below)
source <path to merlin venv>/bin/activate

# Print out the workers command
merlin run-workers ${YAML_FILE} --echo

# Run the workers on the allocation
merlin run-workers ${YAML_FILE}

# Delay until the workers cease running
merlin monitor
This script can be submitted using:
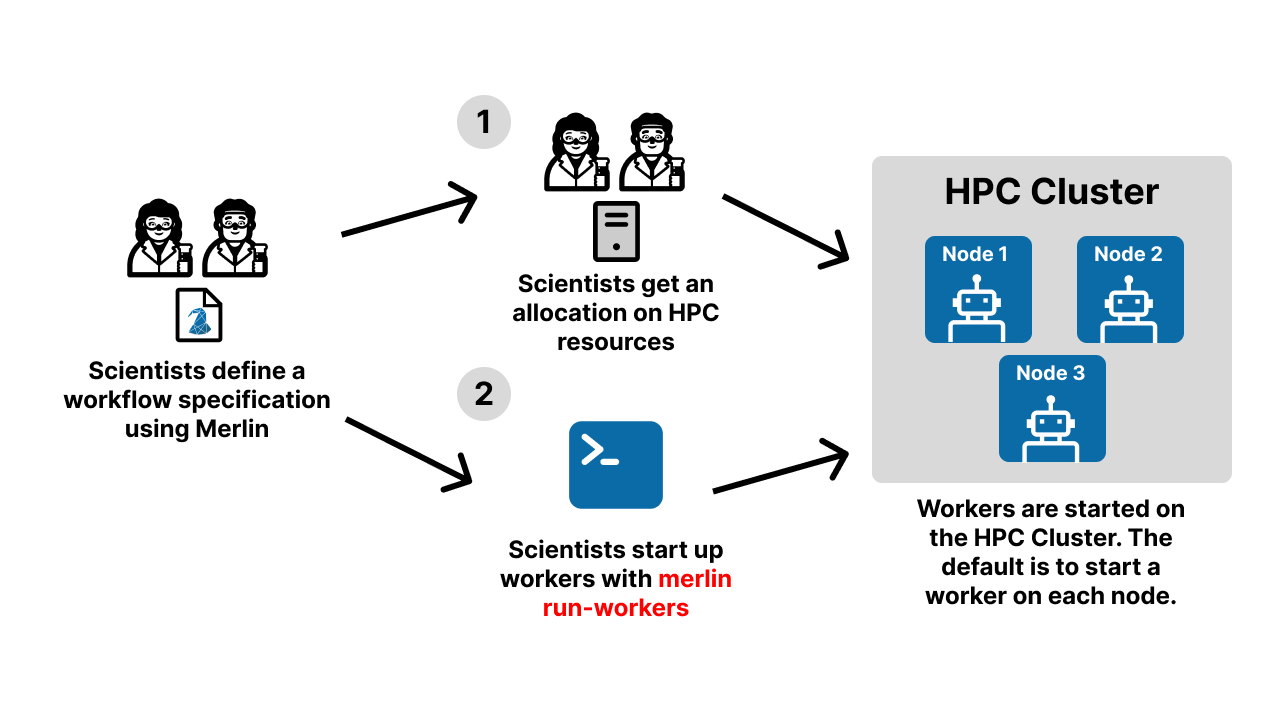
Below is a visual demonstration of this worker startup process. Steps 1 and 2 in this diagram are both handled by the bash script given above.
Note
The robots in this diagram represent the workers that are started on each node of the allocation. This is the default behavior when workers are spun up. If you'd like to modify how many nodes a worker possesses, that can be customized in the resources section of the merlin block in your spec file.
Warning
Launching workers on the current node should be done with caution as the default behavior is for them to occupy all CPUs on a node. This can be modified with the --concurrency value provided to the workers. See the Configuring Celery Workers section for more details.
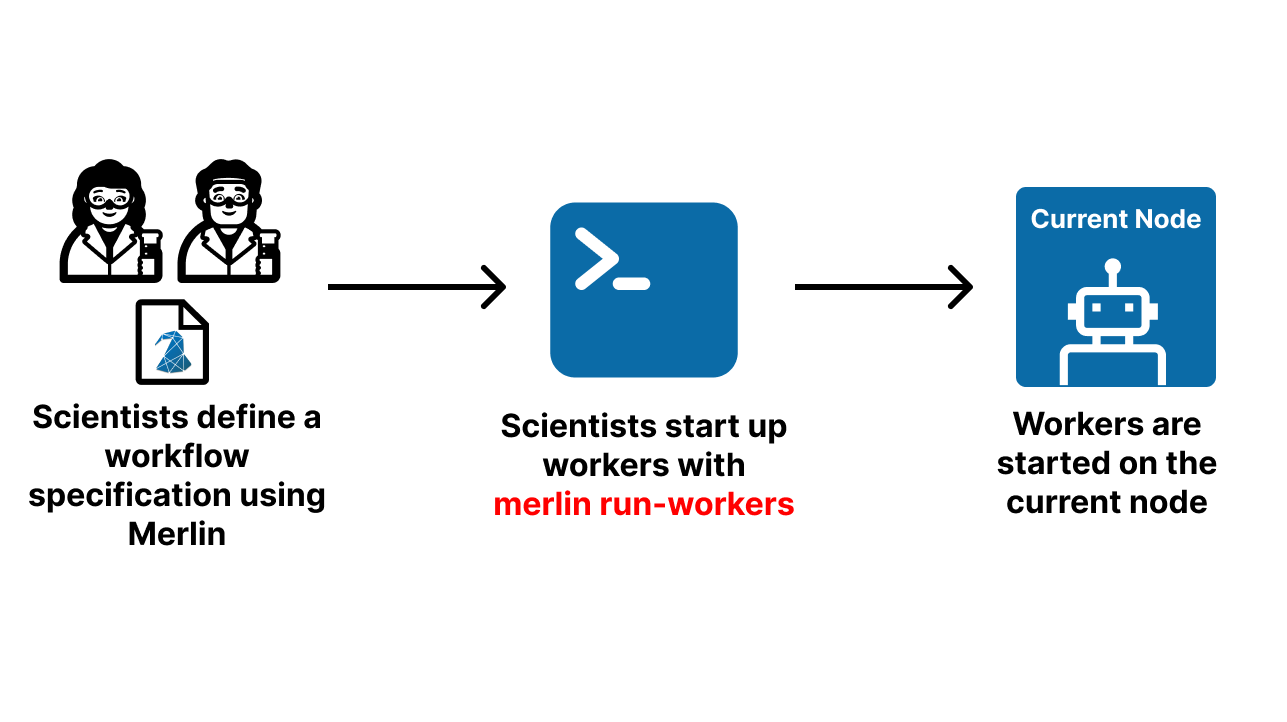
Workers can be launched on the current node by running:
Below is a visual demonstration of this worker startup process. The robot represents the workers started on the current node.
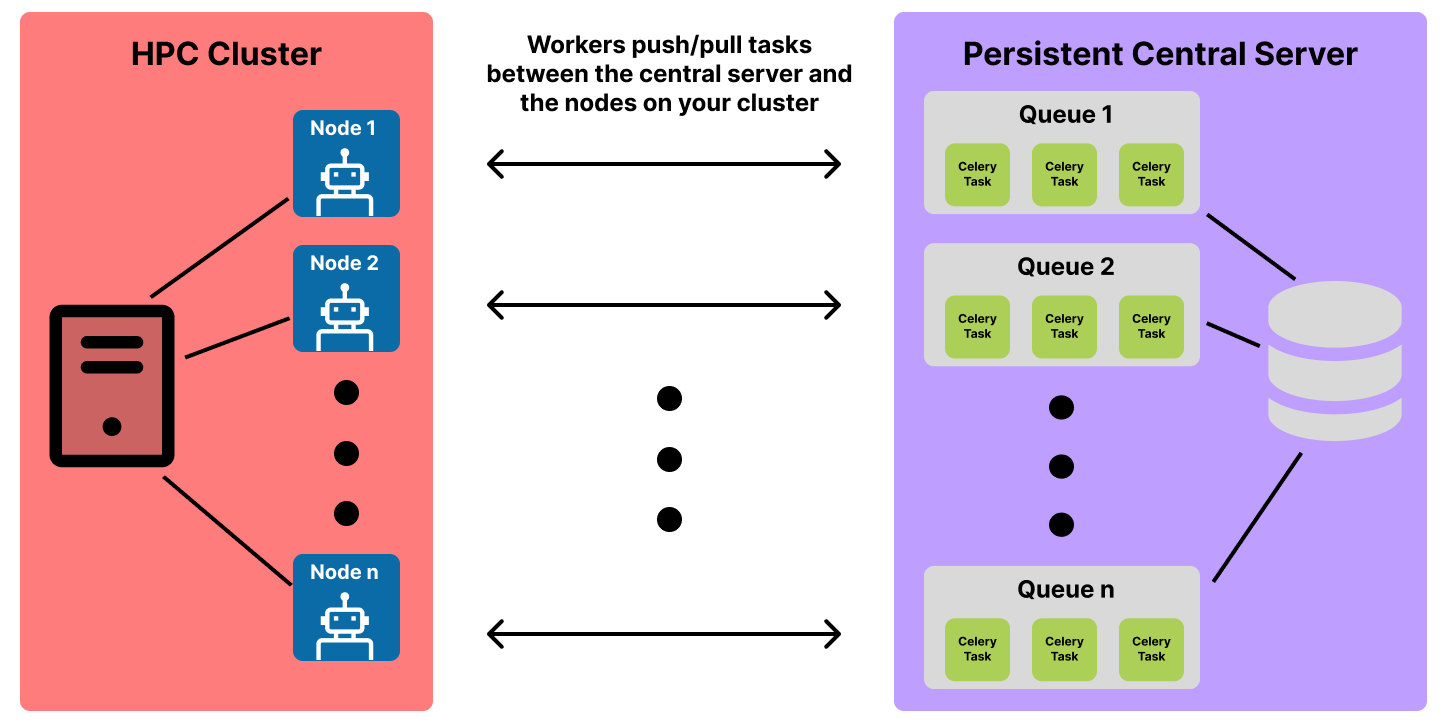
The workers that you spin up will live on the node(s) of your allocation and communicate with both the broker (to pull tasks from the queues for execution) and the results server (to store task state information). The communication between the worker and the broker is two-way so that the worker can push new tasks to the server as the workflow executes and pull existing tasks from the server that need to be executed. Below is a visual representation of this communication:
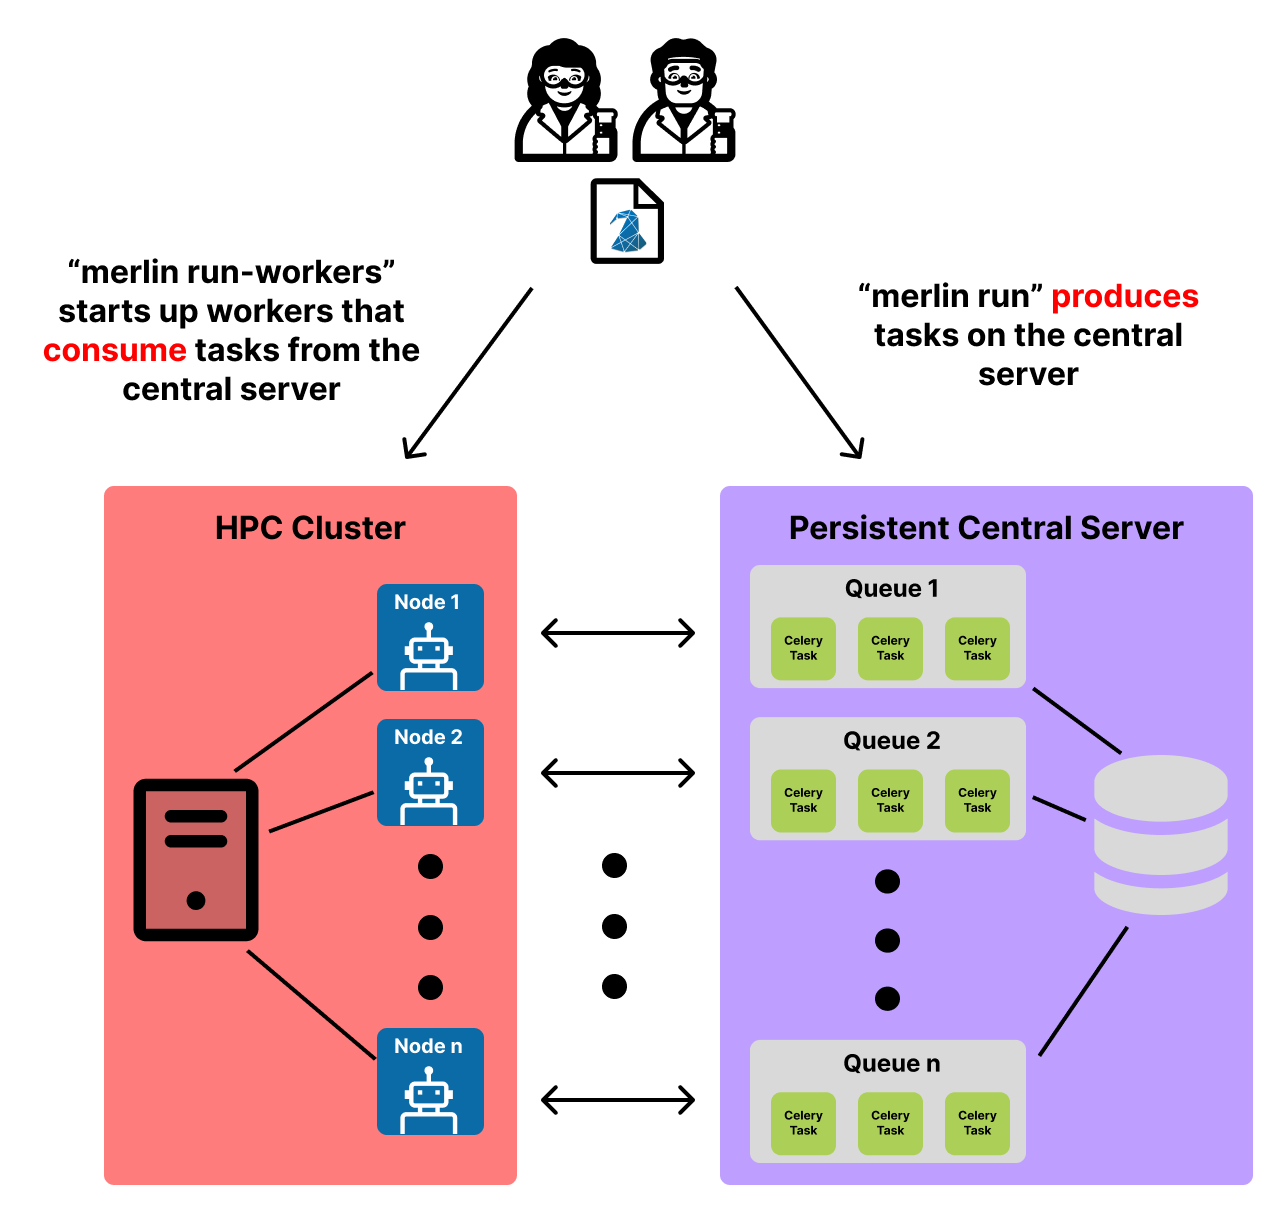
If we put everything from this section together, we can see the full picture of the producer-consumer model that Merlin utilizes in workflow runs:
Once finished executing, workers can be stopped with the merlin stop-workers command:
Dry Runs
Tip
It may be helpful to have an understanding of The Basics of the study output workspace in order to fully grasp how dry runs work with Merlin.
Note
If you wish to execute a workflow after dry-running it, simply use merlin restart (to understand why this works, see the section below on Restarting Workflows).
'Dry run' means telling workers to create a study's workspace and all of its necessary subdirectories and scripts (with variables expanded) without actually executing the scripts.
To dry-run a workflow, use --dry with merlin run:
Example
Say we have the following spec file:
description:
    name: dry_run_example
    description: An example workflow to demonstrate the dry run functionality in Merlin

study:
    - name: step_1
      description: Echo that we're in step_1
      run:
        cmd: echo "in step_1"

    - name: step_2
      description: Echo that we're in step_2
      run:
        cmd: echo "in step_2"
        depends: [step_1]
We can execute a dry run of this command with:
This will provide us with a workspace like so:
dry_run_example_<timestamp>/
├── merlin_info
│   ├── dry_run_example.expanded.yaml
│   ├── dry_run_example.orig.yaml
│   └── dry_run_example.partial.yaml
├── step_1
│   └── step_1.sh
└── step_2
    └── step_2.sh
Notice how there are no .out, .err, or MERLIN_FINISHED files. This is because the .sh scripts are generated but not executed.
You can also specify dry runs from the workflow specification file by setting the dry_run property of the batch block to True:
If this is set then you won't need the --dry option when you use merlin run.
Example
Using the same example as above, we can modify the spec file by adding the batch block with dry_run set to True:
description:
name: dry_run_example
description: An example workflow to demonstrate the dry run functionality in Merlin
batch:
    dry_run: True
study:
- name: step_1
description: Echo that we're in step_1
run:
cmd: echo "in step_1"
- name: step_2
description: Echo that we're in step_2
run:
cmd: echo "in step_2"
depends: [step_1]
Now we don't even need to specify the --dry option when we run the workflow:
This will produce the same workspace setup as the previous example.
Restarting Workflows
Note
We recommend having an understanding of The Basics of the study output workspace in order to fully grasp how restarting works with Merlin.
Certain tasks in your workflow may fail at times for various reasons. Often times this can be resolved by simply restarting the workflow and having the task run again.
Much like a normal run of a workflow, a restart can happen either locally or in a distributed manner.
Warning
Make sure you have set up your Configuration before doing a distributed restart.
Workflows can be restarted using the merlin restart command:
Workflows can be restarted locally using the --local option of the merlin restart command:
This command will re-queue all tasks in your workflow but will only execute the tasks that do not have a MERLIN_FINISHED file in their output workspace.
Example
Say we had a workflow run where our third sample in step_1 failed to run because of a timeout with Slurm, so step_2 was never ran. Our resulting workspace from this run may look like:
example_study/
├── merlin_info/
│   ├── example_study.expanded.yaml
│   ├── example_study.orig.yaml
│   └── example_study.partial.yaml
└── step_1/
    ├── 00
    │   ├──MERLIN_FINISHED
    │   ├── step_1.slurm.err
    │   ├── step_1.slurm.out
    │   └── step_1.slurm.sh
    ├── 01
    │   ├── MERLIN_FINISHED
    │   ├── step_1.slurm.err
    │   ├── step_1.slurm.out
    │   └── step_1.slurm.sh
    └── 02
        ├── step_1.slurm.err
        ├── step_1.slurm.out
        └── step_1.slurm.sh
Restarting this workspace with:
...would queue up all 3 samples again but only execute the third sample since it didn't have a MERLIN_FINISHED file. From there, the execution of the workflow would continue and step_2 would be ran after the third sample finished processing.
Command Line Substitution
Merlin allows for the command line substitution of user variables defined in the env block of your spec file. This feature is applicable to any merlin command that supports the --vars option. To check which commands support the --vars option, either view the Command Line Interface page or use the --help option with any Merlin command to see what options are available.
Syntax
When CLI substitution is used, the .orig.yaml file in the merlin_info/ subdirectory of the output workspace will not show the changes. Instead, you can see that the substitution happened by viewing the .partial.yaml and/or the .expanded.yaml files of the merlin_info/ subdirectory.
Using CLI Substitution
In this example we'll use a spec file that calculates cylindrical tank flow rate with water as the liquid. Here we'll have two variables that we'll modify from the CLI, RADIUS and HEIGHT, to change the size of the tank:
description:
    name: cylindrical_flow_rate
    description: An example workflow to calculate cylindrical tank flow rate with water as the liquid.

env:
    variables:
        RADIUS: 2  # Units are meters
        HEIGHT: 5  # Units are meters
        HEIGHT_DIFFERENCE: 1  # Assume a height difference for the flow (e.g., 1 meter)
        GRAV_ACCELERATION: 9.8  # Assume gravitational acceleration g = 9.8 m/s^2

study:
    - name: calculate_flow_rate
      description: calculate the flow rate of the cylindrical tank
      run:
        cmd: |
            import math

            # Calculate volume of the cylindrical tank
            volume = math.pi * $(RADIUS)**2 * $(HEIGHT)

            # Calculate area of the opening
            opening_area = math.pi * $(RADIUS)**2

            # Calculate velocity of water flow
            velocity = math.sqrt(2 * $(GRAV_ACCELERATION) * $(HEIGHT_DIFFERENCE))

            # Calculate flow rate
            flow_rate = opening_area * velocity

            # Write results to output file
            with open(f"$(WORKSPACE)/flow_rate.out", "w") as flow_file:
                flow_file.write(f"Volume of the cylindrical tank: {volume:.2f} cubic meters\nFlow rate of water: {flow_rate:.2f} cubic meters per second")
        shell: /usr/bin/env python3
Running this normally with
...provides us with the following output:
Volume of the cylindrical tank: 62.83 cubic meters
Flow rate of water: 55.63 cubic meters per second
Now let's make the tank bigger from the command line:
We can see how this substitution does not show up in the .orig.yaml file of the merlin_info/ subdirectory of the output workspace but it does show up in the .partial.yaml and .expanded.yaml files:
description:
    name: cylindrical_flow_rate
    description: An example workflow to demonstrate CLI substitution with Merlin. This workflow is calculating cylindrical tank flow rate with water as the liquid.

env:
    variables:
        RADIUS: 2  # Units are meters
        HEIGHT: 5  # Units are meters
        HEIGHT_DIFFERENCE: 1  # Assume a height difference for the flow (e.g., 1 meter)
        GRAV_ACCELERATION: 9.8  # Assume gravitational acceleration g = 9.8 m/s^2
description:
    name: cylindrical_flow_rate
    description: An example workflow to demonstrate CLI substitution with Merlin. This workflow is calculating cylindrical tank flow rate with water as the liquid.

batch:
    type: local
    dry_run: false
    shell: /bin/bash

env:
    variables:
        RADIUS: 14
        HEIGHT: 20
        HEIGHT_DIFFERENCE: 1
        GRAV_ACCELERATION: 9.8
.
.
.
As expected, this run will provide us with different output:
Iterative Runs
With the producer/consumer model from Distributed Runs and Command Line Substitution, suddenly iterative workflows with Merlin become possible.
Most iterative workflows can follow the same general template for iterating. These workflows can be created with three easy steps:
- Adding a variable to track the current iteration number
- Adding a variable to set the max number of iterations
- Creating an iteration step in your workflow that starts the next iteration using command line substitution
Below is a demo spec file showcasing these steps:
description:
    name: example_iterative_wf_iter_$(ITER)
    description: An example iterative workflow

env:
    variables:
        ITER: 1  # (1)
        MAX_ITER: 10  # (2)

study:
    - name: iterate  # (3)
      description: Determine whether to iterate or to stop the workflow
      run:
        cmd: |
            # Check to see if we should stop iterating
            if [ $(ITER) -ge $(MAX_ITER) ] ; then
                echo "done"
            else
                # Up the iteration count by one
                next_iter=$(ITER)
                ((next_iter=next_iter+1))
                echo "Starting iteration " $next_iter

                # Move back to the SPECROOT so that the output of our next run isn't nested in the current run
                cd $(SPECROOT)

                # Use command line substitution to pass in the next iteration value
                merlin run $(SPECROOT)/example_iterative_wf.yaml --vars ITER=$next_iter
            fi
- Set the initial iteration number to be 1
- Set the max number of iterations to be 10
- The iteration step should almost always be the last step in your workflow
Note
For a more detailed example, see the Iterative Demo.
With this setup, you'll only need to manually submit the first iteration of your workflow with merlin run:
The following iterations will be queued by the workers when they process the iterate step and use the nested merlin run command.
Additionally, we only have to start our workers with merlin run-workers one time before the first iteration:
Since they remain alive until we manually stop them with merlin stop-workers the workers will continue to watch the queues on the broker until we tell them not to.
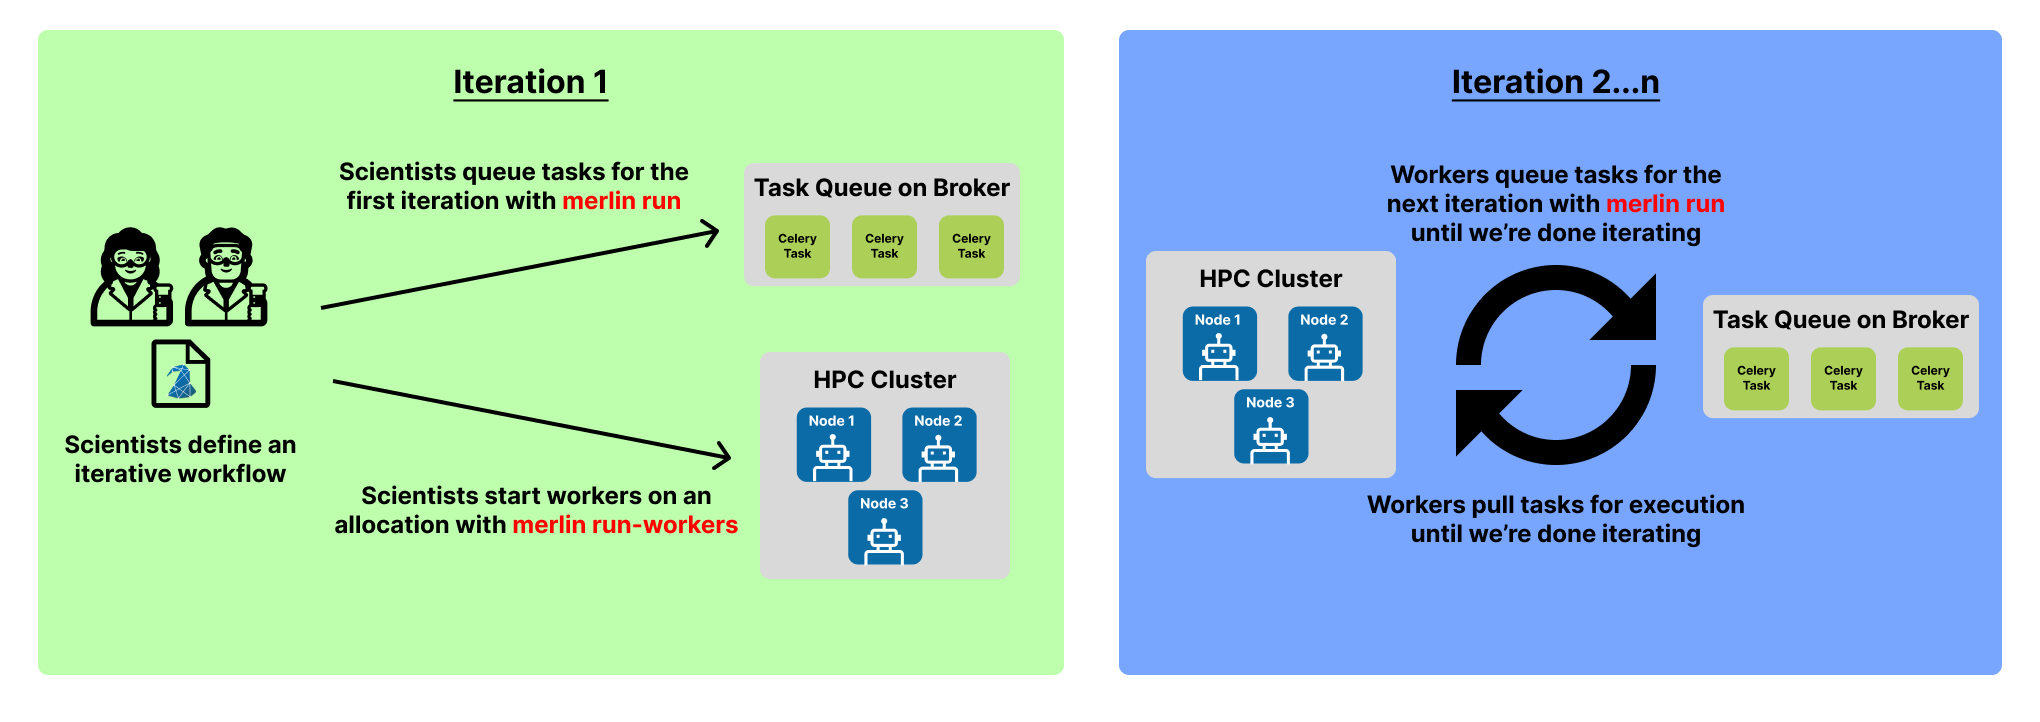
Putting everything together, this means the workers will act as both the producer and the consumer for this workflow. They will be producing tasks with the iterative call to merlin run and then consuming those tasks when they pull them from the queue(s) on the broker for execution.
Below is a visual representation of the iterative process.