Hello World Examples
In this page we'll cover everything related to the Hello and Hello Samples examples. You can obtain all of the files related to these examples by running:
After running either of those commands, a folder called hello/ should be created which contains all of the files related to these examples. The directory structure should look like:
    hello
    |-- hello_samples.yaml
    |-- hello.yaml
    |-- make_samples.py
    |-- my_hello.yaml
    `-- requirements.txt
Here, hello.yaml is the spec file for a simple "hello world" workflow. Similarly, hello_samples.yaml also represents a "hello world" workflow but it adds additional complexity by introducing samples. The last workflow here called my_hello.yaml is a skeleton workflow that is intended to be filled out by following Step 3 of the Tutorial.
The Hello Example
The hello example is a simple workflow that runs an echo command two times in order to say hello in two different languages. We can break this example down by looking at each block in the spec file.
Spec Breakdown
For this example, we'll only need three blocks for our spec file: description, global.parameters, and study. Let's dive into what each of these blocks are.
Block: description
The description block always contains the name and a description of your study. This block is required in Merlin so you'll need it in every spec file you create.
Block: global.parameters
Info
You can replace the global.parameters block by using the Parameter Generator (pgen) functionality. You can see the Feature Demo for an instance of this or you can view Maestro's Documentation on pgen for more information on this feature.
The global.parameters block is where we place all of the parameters we'd like to vary in a study. Here we have two parameters named GREET and WORLD that each contain two values and a label. It's important to note that each variable must contain the same number of values.
The %% format used with each label will correspond to the values as they're processed. For instance, on the first iteration of any step using these parameters, the labels will be GREET.hello and WORLD.world. Then on the second iteration they'd change to GREET.hola and WORLD.mundo.
global.parameters:
GREET:
values : ["hello","hola"]
label : GREET.%%
WORLD:
values : ["world","mundo"]
label : WORLD.%%
Block: study
The final block to look at here is the study block, which contains the definitions of how to run each step in our workflow.
Each step is denoted by a hyphen and must contain 3 keys: name, description, and run. The name and description keys always represent the name and description of the step. Here, the run key defines the command to run for this step, as well as any steps that this step depends on and the shell to use for running this step.
When Merlin reads in this block, it will generate a directed acyclic graph (DAG) by interpreting which steps depend on which other steps. This will determine the order that steps are ran.
study:
- name: step_1
description: say hello
run:
cmd: echo "$(GREET), $(WORLD)!"
- name: step_2
description: print a success message
run:
cmd: print("Hurrah, we did it!")
depends: [step_1_*]
shell: /usr/bin/env python3
In step_1, we provide a command to run that will echo a message based on the parameters we defined in the global.parameters block. Since there are two values in each parameter (i.e. 2 parameter sets), this step will be run twice in total.
In step_2, we show that you don't have to use /bin/bash as your shell for a step. Here, we choose to use Python 3 as our shell instead. Notice we now have to use print rather than echo to achieve essentially the same functionality as in step_1.
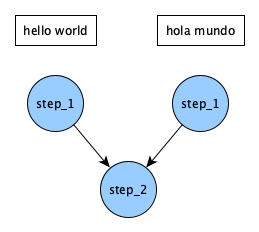
In step_2 we also provide another key depends that will tell Merlin to not run this step until the previous step(s) have finished. Notice how we add the _* to step_1 here. What could that be doing? Well, if we omitted this and instead said depends: [step_1], we'd be telling step_2 to run for each parameter set, which in this case seems redundant. If you're more of a visual learner then what this means is that the DAG generated by our step definitions would be:

By adding on the _* we're telling step_2 to wait for both parameterized versions of step_1 to complete before running. Our DAG now funnels so that step_2 is only ran once:
The Full Spec
By combining the three blocks discussed above, our full spec file becomes:
Full Hello Spec
description:
    name: hello
    description: a very simple merlin workflow
global.parameters:
    GREET:
        values : ["hello","hola"]
        label  : GREET.%%
    WORLD:
        values : ["world","mundo"]
        label  : WORLD.%%
study:
    - name: step_1
        description: say hello
        run:
            cmd: echo "$(GREET), $(WORLD)!"

    - name: step_2
        description: print a success message
        run:
            cmd: print("Hurrah, we did it!")
            depends: [step_1_*]
            shell: /usr/bin/env python3
Running the Study
When running a study we can either run it locally or in a distributed manner.
Running Locally
To run the study locally, we can use the command:
If everything ran properly, your output at the command line will look something like this:
Success
       *
   *~~~~~
  *~~*~~~*      __  __           _ _
 /   ~~~~~     |  \/  |         | (_)
     ~~~~~     | \  / | ___ _ __| |_ _ __
    ~~~~~*     | |\/| |/ _ \ '__| | | '_ \
   *~~~~~~~    | |  | |  __/ |  | | | | | |
  ~~~~~~~~~~   |_|  |_|\___|_|  |_|_|_| |_|
 *~~~~~~~~~~~
   ~~~*~~~*    Machine Learning for HPC Workflows


[2023-12-19 17:41:02: INFO] Loading specification from path: /path/to/hello.yaml
[2023-12-19 17:41:02: WARNING] Workflow specification missing
encouraged 'merlin' section! Run 'merlin example' for examples.
Using default configuration with no sampling.
[2023-12-19 17:41:02: INFO] OUTPUT_PATH: hello
[2023-12-19 17:41:02: INFO] Study workspace is '/path/to/hello_20231219-174102'.
[2023-12-19 17:41:02: INFO] Reading app config from file /path/to/.merlin/app.yaml
[2023-12-19 17:41:02: INFO] Overriding default celery config with 'celery.override' in 'app.yaml':
        visibility_timeout:     86400
[2023-12-19 17:41:02: INFO] Calculating task groupings from DAG.
[2023-12-19 17:41:02: INFO] Converting graph to tasks.
[2023-12-19 17:41:02: INFO] Launching tasks.
WARNING:celery.backends.redis:
Setting ssl_cert_reqs=CERT_NONE when connecting to redis means that celery will not validate the identity of the redis broker when connecting. This leaves you vulnerable to man in the middle attacks.

[2023-12-19 17:41:02: INFO] Executing step 'step_1_GREET.hello.WORLD.world' in '/path/to/hello_20231219-174102/step_1/GREET.hello.WORLD.world'...
[2023-12-19 17:41:02: INFO] Execution returned status OK.
[2023-12-19 17:41:02: INFO] Step 'step_1_GREET.hello.WORLD.world' in '/path/to/hello_20231219-174102/step_1/GREET.hello.WORLD.world' finished successfully.
[2023-12-19 17:41:02: INFO] Executing step 'step_1_GREET.hola.WORLD.mundo' in '/path/to/hello_20231219-174102/step_1/GREET.hola.WORLD.mundo'...
[2023-12-19 17:41:02: INFO] Execution returned status OK.
[2023-12-19 17:41:02: INFO] Step 'step_1_GREET.hola.WORLD.mundo' in '/path/to/hello_20231219-174102/step_1/GREET.hola.WORLD.mundo' finished successfully.
[2023-12-19 17:41:02: INFO] Executing step 'step_2' in '/path/to/hello_20231219-174102/step_2'...
[2023-12-19 17:41:02: INFO] Execution returned status OK.
[2023-12-19 17:41:02: INFO] Step 'step_2' in '/path/to/hello_20231219-174102/step_2' finished successfully.
See the Expected Output section below for details on the file tree that was created by running this.
Running in a Distributed Manner
To run your workflow in a distributed manner, first make sure running merlin info doesn't show any errors. If it does, you'll need to setup your Configuration.
Once your configuration is setup properly, we'll need to accomplish two things to run our study: sending tasks to the external server and starting workers to manage and run those tasks. Let's send the tasks to the server first:
This command will process the steps defined in the study block in order to create the DAG that will determine the order that steps need to run in. Additionally, as mentioned before, it will queue tasks in the central server that our workers will pull from once we start them. If this ran properly you should see similar output to this:
Output From Sending Tasks to the Server
       *
   *~~~~~
  *~~*~~~*      __  __           _ _
 /   ~~~~~     |  \/  |         | (_)
     ~~~~~     | \  / | ___ _ __| |_ _ __
    ~~~~~*     | |\/| |/ _ \ '__| | | '_ \
   *~~~~~~~    | |  | |  __/ |  | | | | | |
  ~~~~~~~~~~   |_|  |_|\___|_|  |_|_|_| |_|
 *~~~~~~~~~~~
   ~~~*~~~*    Machine Learning for HPC Workflows


[2023-12-19 17:45:36: INFO] Loading specification from path: /path/to/hello.yaml
[2023-12-19 17:45:36: WARNING] Workflow specification missing
encouraged 'merlin' section! Run 'merlin example' for examples.
Using default configuration with no sampling.
[2023-12-19 17:45:36: INFO] OUTPUT_PATH: hello
[2023-12-19 17:45:36: INFO] Study workspace is '/path/to/hello_20231219-174536'.
[2023-12-19 17:45:36: INFO] Reading app config from file /path/to/.merlin/app.yaml
[2023-12-19 17:45:36: INFO] Overriding default celery config with 'celery.override' in 'app.yaml':
        visibility_timeout:     86400
[2023-12-19 17:45:36: INFO] Calculating task groupings from DAG.
[2023-12-19 17:45:36: INFO] Converting graph to tasks.
[2023-12-19 17:45:36: INFO] Launching tasks.
WARNING:celery.backends.redis:
Setting ssl_cert_reqs=CERT_NONE when connecting to redis means that celery will not validate the identity of the redis broker when connecting. This leaves you vulnerable to man in the middle attacks.
Now that our tasks are queued we need to start a worker to complete them. First, open a new terminal window. When we start the workers the process will run continuously until we tell the workers to stop. In order to be able to run commands to interact with these workers, we'll need to have two terminal windows: one with the workers running and another for whatever else we need to do.
Once we run the next command and the worker spins up, it will immediately start processing the tasks that we sent to the queue with merlin run. Let's start the workers now:
If this ran properly, you should see the following output plus additional log statements from celery to show that tasks are being processed:
Output From Running Workers
       *
   *~~~~~
  *~~*~~~*      __  __           _ _
 /   ~~~~~     |  \/  |         | (_)
     ~~~~~     | \  / | ___ _ __| |_ _ __
    ~~~~~*     | |\/| |/ _ \ '__| | | '_ \
   *~~~~~~~    | |  | |  __/ |  | | | | | |
  ~~~~~~~~~~   |_|  |_|\___|_|  |_|_|_| |_|
 *~~~~~~~~~~~
   ~~~*~~~*    Machine Learning for HPC Workflows


[2023-12-19 17:46:46: INFO] Loading specification from path: /path/to/hello.yaml
[2023-12-19 17:46:46: WARNING] Workflow specification missing
encouraged 'merlin' section! Run 'merlin example' for examples.
Using default configuration with no sampling.
[2023-12-19 17:46:46: INFO] Launching workers from '/path/to/hello.yaml'
[2023-12-19 17:46:46: INFO] Starting workers
[2023-12-19 17:46:46: INFO] Reading app config from file /path/to/.merlin/app.yaml


-------------- celery@worker_name.%machine770 v5.3.4 (emerald-rush)
--- ***** -----
-- ******* ---- Linux-4.18.0-513.9.1.1toss.t4.x86_64-x86_64-with-glibc2.28 2023-12-19 17:46:49
- *** --- * ---
- ** ---------- [config]
- ** ---------- .> app:         merlin:0x2aaab20619e8
- ** ---------- .> transport:   amqps://user:**@server:5671//user
- ** ---------- .> results:     redis://user:**@server:6379/0
- *** --- * --- .> concurrency: 36 (prefork)
-- ******* ---- .> task events: OFF (enable -E to monitor tasks in this worker)
--- ***** -----
-------------- [queues]
                .> [merlin]_merlin  exchange=[merlin]_merlin(direct) key=[merlin]_merlin


[tasks]
. merlin.common.tasks.add_merlin_expanded_chain_to_chord
. merlin.common.tasks.expand_tasks_with_samples
. merlin.common.tasks.merlin_step
. merlin:chordfinisher
. merlin:queue_merlin_study
. merlin:shutdown_workers

[2023-12-19 17:46:47,549: INFO] Connected to amqps://user:**@server:5671//user
[2023-12-19 17:46:47,599: INFO] mingle: searching for neighbors
[2023-12-19 17:46:48,807: INFO] mingle: sync with 2 nodes
[2023-12-19 17:46:48,807: INFO] mingle: sync complete
[2023-12-19 17:46:48,835: INFO] celery@worker_name.%machine770 ready.
After all of the tasks in the workflow finish processing it will look like the celery workers are still up and running, and that's because they are. However, that doesn't mean that they're still processing tasks. To check if there are still tasks running, you can use the status command:
If there are no tasks in the queues then our workers are done processing this study and are ready to be stopped:
Note
This is always necessary unless you'd like to keep your celery workers alive and listening for tasks constantly.
Expected Output
Running a study will always produce an output directory containing the commands that were run in each step and the outputs produced. To view the entire output directory structure you can use:
The result should look like so:
Successful Directory Structure
hello_<timestamp>/
    |-- merlin_info
    |   |-- hello.expanded.yaml
    |   |-- hello.orig.yaml
    |   `-- hello.partial.yaml
    |-- step_1
    |   |-- GREET.hello.WORLD.world
    |   |   |-- MERLIN_FINISHED
    |   |   |-- step_1_GREET.hello.WORLD.world.err
    |   |   |-- step_1_GREET.hello.WORLD.world.out
    |   |   `-- step_1_GREET.hello.WORLD.world.sh
    |   `-- GREET.hola.WORLD.mundo
    |       |-- MERLIN_FINISHED
    |       |-- step_1_GREET.hola.WORLD.mundo.err
    |       |-- step_1_GREET.hola.WORLD.mundo.out
    |       `-- step_1_GREET.hola.WORLD.mundo.sh
    `-- step_2
        |-- MERLIN_FINISHED
        |-- step_2.err
        |-- step_2.out
        `-- step_2.sh
The merlin_info directory contains three different forms of the spec file we provided:
hello.expanded.yaml: The entire spec with all the variables expandedhello.orig.yaml: An exact copy of the spec we ranhello.partial.yaml: A copy of the original spec plus all of the default values for each block that Merlin will fill in for you if omitted.
In the step_1 directory notice that a subdirectory is created for each parameter set. Within each parameter set, and similarly for step_2, you'll find four files:
- A
MERLIN_FINISHEDfile which is created at the time the step completes. If this file isn't there then either your step hasn't finished or there was a problem running this step and you should check the.errfile. - A
.shfile containing the command that was run for this step - A
.outfile containing the stdout generated from the command - A
.errfile containing any errors generated from the command (hopefully none). This is one of the most useful places to look for debugging.
Let's check the outputs from our study:
If everything ran properly, the output should look like so:
Congratulations you've successfully run a Merlin study! The next section will cover how to add samples to this example.
The Hello Samples Example
Note
Before running this example, make sure to install the requirements with:
The hello samples example is very similar to the hello example discussed above, but it has one key difference: the use of samples. While parameters are static, samples are generated dynamically and can be more complex data types.
For this example, instead of echoing variations of "hello world", this time we'll say hello to a couple friends! We'll generate our friends' names (our samples) using the make_samples.py script.
The Sample Generation Script
The make_samples.py script will be used in this example to generate a list of sample names and write them to a csv file for use in our workflow. This section will serve as a section-by-section breakdown of what this script entails.
This first section is just handling the imports of the libraries that we'll need.
-
The
argparselibrary will handle how we pass arguments to this script -
The
nameslibrary will be what we use to generate names -
The
numpylibrary will be used to randomize our selection of generated names. We'll alias this library asnpwhich is standard practice.
The second section is where we utilize the argparse library to set up our arguments. The arguments to this script will be --number to represent the number of names to generate and --filepath to set the name of the file to store these samples in. This will make the usage of this script become:
The third section is where we use the names and numpy libraries to generate our sample names and randomly select them.
The final section is where we concatenate the names that we've selected into a string where one name is on each line. We then take this string and write it to our file.
Spec Breakdown
There are 3 big differences between this spec and the spec used for the hello example:
- Switching the
WORLDvariable from a parameter to a column label - The addition of the
envblock - The addition of the
merlinblock
We need to remove the WORLD parameter from the global.paremeters block here since we're going to make it a sample column label instead. Since our samples here are randomly-generated names, the value of WORLD will go from being "world" or "mundo" to a name.
Removing the WORLD parameter makes our global.parameters block become:
Now let's take a look at the two new blocks that we're introducing: env and merlin.
Block: env
The env block is where we define values that will be substituted into the workflow. In the case of this example we define one variable N_SAMPLES to represent the number of samples to generate.
Block: merlin
The merlin block is where we can define sample generation and celery worker specifics. Each sample that we generate and use will be run for each parameter set (if used together). In this example we'll just use the default worker, so we can ignore the celery worker specifics and just focus on sample generation:
merlin:
samples:
generate:
cmd: python3 $(SPECROOT)/make_samples.py --filepath=$(MERLIN_INFO)/samples.csv --number=$(N_SAMPLES)
file: $(MERLIN_INFO)/samples.csv
column_labels: [WORLD]
In the command to generate the samples, we run our Python script and provide it with an output filepath to store the samples we generate. Additionally, we hand it the number of samples to generate. We then use the file key to tell Merlin where the generated samples will exist and the column_labels key to label the samples we just created.
Note
For simplicity we left the column label as WORLD, just like in The Hello Example. Best practice would likely be to rename this NAME and modify the $(WORLD) statement in step_1 to be $(NAME), but we'll keep it as WORLD here.
The SPECROOT and MERLIN_INFO variables are reserved variables in Merlin. To see more about them, consult the Reserved Variables section of the user guide.
The DAG and Full Spec
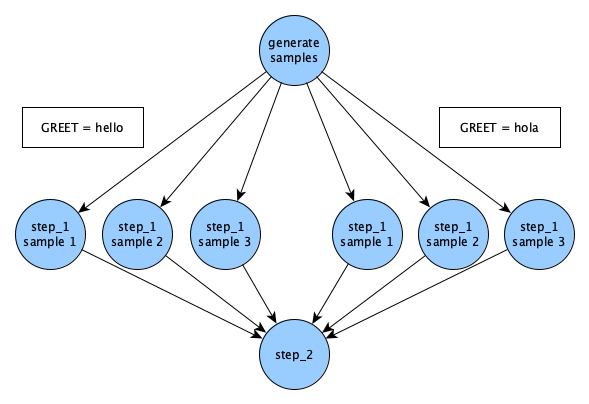
The introduction of samples will make the DAG generated by this workflow be slightly more complex than the hello example. Every sample that's generated in Merlin will run for each parameter set. So, since we have one parameter GREET with two values hello and hola (two parameter sets), and three sample names, we'll get six different runs of step_1:
With the modifications to the global.parameters block and the additions of the env and merlin blocks the full hello_samples.yaml spec becomes:
Full Hello Samples Spec
description:
name: hello_samples
description: a very simple merlin workflow, with samples
env:
variables:
N_SAMPLES: 3
global.parameters:
    GREET:
        values : ["hello","hola"]
        label  : GREET.%%
study:
- name: step_1
description: say hello
run:
cmd: echo "$(GREET), $(WORLD)!"
- name: step_2
description: print a success message
run:
cmd: print("Hurrah, we did it!")
depends: [step_1_*]
shell: /usr/bin/env python3
merlin:
    samples:
        generate:
            cmd: python3 $(SPECROOT)/make_samples.py --filepath=$(MERLIN_INFO)/samples.csv --number=$(N_SAMPLES)
        file: $(MERLIN_INFO)/samples.csv
        column_labels: [WORLD]
Running the Study
As with the hello example (and any Merlin workflow), this study can be ran locally. However, here we'll be running in a distributed manner as that's the most common way to run Merlin workflows. Just as with the hello example, we'll need to queue up our tasks on the server and start up workers to manage these tasks.
To queue up the tasks:
If this ran successfully, you should see the following output:
Output From Sending Tasks to the Server
       *
   *~~~~~
  *~~*~~~*      __  __           _ _
 /   ~~~~~     |  \/  |         | (_)
     ~~~~~     | \  / | ___ _ __| |_ _ __
    ~~~~~*     | |\/| |/ _ \ '__| | | '_ \
   *~~~~~~~    | |  | |  __/ |  | | | | | |
  ~~~~~~~~~~   |_|  |_|\___|_|  |_|_|_| |_|
 *~~~~~~~~~~~
   ~~~*~~~*    Machine Learning for HPC Workflows


[2023-12-07 09:26:35: INFO] Loading specification from path: <path to example>/hello/hello_samples.yaml
[2023-12-07 09:26:35: INFO] OUTPUT_PATH: hello
[2023-12-07 09:26:35: INFO] Study workspace is '<path to example>/hello/hello_samples_<timestamp>'.
[2023-12-07 09:26:35: INFO] Reading app config from file <path to configuration>/app.yaml
[2023-12-07 09:26:35: INFO] Overriding default celery config with 'celery.override' in 'app.yaml':
        visibility_timeout:     86400
[2023-12-07 09:26:36: INFO] Generating samples...
[2023-12-07 09:26:36: INFO] Generating samples complete!
[2023-12-07 09:26:36: INFO] Loading samples from 'samples.csv'...
[2023-12-07 09:26:36: INFO] 3 samples loaded.
[2023-12-07 09:26:36: INFO] Calculating task groupings from DAG.
[2023-12-07 09:26:36: INFO] Converting graph to tasks.
[2023-12-07 09:26:36: INFO] Launching tasks.
WARNING:celery.backends.redis:
Setting ssl_cert_reqs=CERT_NONE when connecting to redis means that celery will not validate the identity of the redis broker when connecting. This leaves you vulnerable to man in the middle attacks.
Now, just like with the hello example, we'll want to make sure a second terminal window is open for when we start our workers. Once you have a second window open, we can start the workers with:
The workers will immediately start processing the tasks that we sent to the server with the merlin run command.
Once successfully ran you should see ouptut similar to the following with some additional messages from Celery about task execution:
Output From Running Workers
       *
   *~~~~~
  *~~*~~~*      __  __           _ _
 /   ~~~~~     |  \/  |         | (_)
     ~~~~~     | \  / | ___ _ __| |_ _ __
    ~~~~~*     | |\/| |/ _ \ '__| | | '_ \
   *~~~~~~~    | |  | |  __/ |  | | | | | |
  ~~~~~~~~~~   |_|  |_|\___|_|  |_|_|_| |_|
 *~~~~~~~~~~~
   ~~~*~~~*    Machine Learning for HPC Workflows


[2023-12-07 10:21:30: INFO] Loading specification from path: <path to example>/hello/hello_samples.yaml
[2023-12-07 10:21:30: INFO] Launching workers from '<path to example>/hello/hello_samples.yaml'
[2023-12-07 10:21:30: INFO] Starting workers
[2023-12-07 10:21:30: INFO] Reading app config from file <path to configuration>/app.yaml
[2023-12-07 10:21:33,446: WARNING] Setting ssl_cert_reqs=CERT_NONE when connecting to redis means that celery will not validate the identity of the redis broker when connecting. This leaves you vulnerable to man in the middle attacks.


-------------- celery@default_worker.%ruby965 v5.3.4 (emerald-rush)
--- ***** -----
-- ******* ---- Linux-4.18.0-477.27.1.1toss.t4.x86_64-x86_64-with-glibc2.28 2023-12-07 10:21:33
- *** --- * ---
- ** ---------- [config]
- ** ---------- .> app:         merlin:0x15553ee391e0
- ** ---------- .> transport:   amqps://<user>:**@<broker server>:<port>/<vhost>
- ** ---------- .> results:     rediss://:**@<results backend server>:<port>/<db_num>
- *** --- * --- .> concurrency: 56 (prefork)
-- ******* ---- .> task events: OFF (enable -E to monitor tasks in this worker)
--- ***** -----
-------------- [queues]
                .> [merlin]_merlin  exchange=[merlin]_merlin(direct) key=[merlin]_merlin


[tasks]
. merlin.common.tasks.add_merlin_expanded_chain_to_chord
. merlin.common.tasks.expand_tasks_with_samples
. merlin.common.tasks.merlin_step
. merlin:chordfinisher
. merlin:queue_merlin_study
. merlin:shutdown_workers
After all of the tasks in the workflow finish processing it will look like the celery workers are still up and running, and that's because they are. However, that doesn't mean that they're still processing tasks. To check if there are still tasks running, you can use the status command:
If there are no tasks in the queues then our workers are done processing this study and are ready to be stopped:
Note
This is always necessary unless you'd like to keep your celery workers alive and listening for tasks constantly.
Expected Output
Since we introduced samples in this example, the output directory structure will contain slightly more files than the hello example. The differences will be shown in merlin_info/ and step_1/; step_2 was not modified and therefore will have the same behavior as in the hello example.
Let's start by investigating the differences in the merlin_info/ directory:
If everything ran properly, you should see an output directory structure like so:
Successful merlin_info/ Directory Structure
Similarly to the hello example from before, we have the 3 forms of our spec file in the merlin_info/ directory. However, now we have 4 new files:
cmd.sh: This is the file containing the bash commands necessary for generating our samples. The contents of this file come directly from thesamplessection of themerlinblock in our spec file.cmd.out: This file will contain any stdout generated by thecmd.shscript.cmd.err: This file will contain any stderr generated by thecmd.shscript (hopefully none). If your workflow had trouble generating samples then this should be the first place you look for more information on why an error occurred.samples.csv: This is the file containing the samples that we generated. We provided this file name in thesamplessection of themerlinblock in our spec file.
Now let's take a look at the step_1 directory. If successfully ran, the directory should look like so:
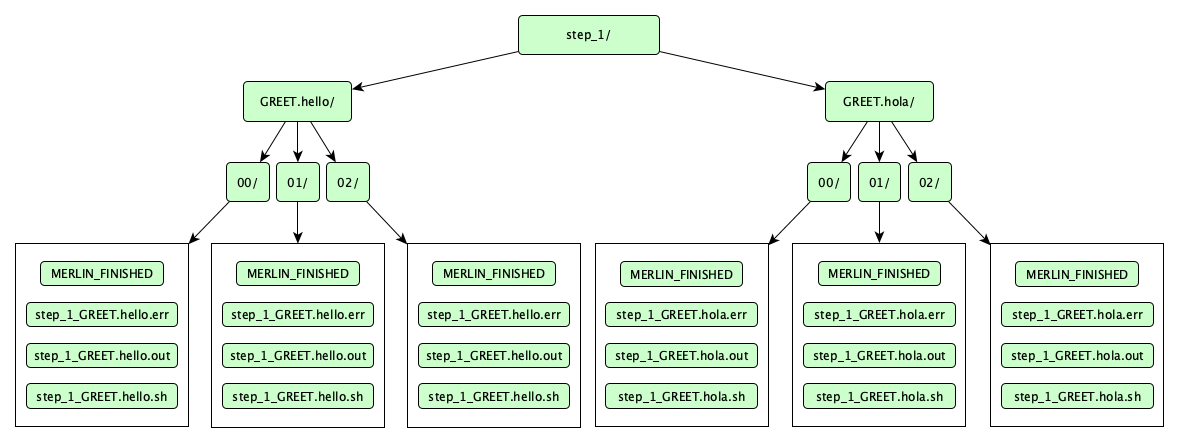
Numerically-named directories like 00/, 01/, and 02/ are sample directories. Notice that each sample ran for both of our parameter sets. In other words, the parameter set where GREET=hello and the parameter set where GREET=hola both ran all 3 samples that we generated.
Finally, let's check the outputs of our study:
The outputs should look similar to this (the names presented here will vary):
Success
Congratulations you've successfully run a Merlin study using samples! See the other examples for more features that Merlin offers.